

How To Add Background To Picture On Iphone
Do you sometimes wish you could change the background around the subject in your iPhone photos? It may be too plain or perhaps you want to add a textured background or a more exciting backdrop. In this tutorial you'll learn how to easily remove and replace the background of your iPhone photos using the Superimpose app.

What Kind Of Photos Work Best?
There are several ways to remove and replace the background of an image. What I'll be covering in this tutorial is a very simple method which works best with certain kinds of photos.
Photos that have a simple composition, contain a solid background color and have a strong color contrast between the subject and the background are ideal.

This rose image is perfect for changing the background because both the subject (the roses) and the background are simple. We have a solid background color and there is a strong contrast between the colors of the roses and the white background. This makes an ideal photo for this tutorial.
Which App To Use
Although there are several apps that can replace a background, I like to use the Superimpose app ($1.99) for this purpose. It's designed to be used with two photos at once – a background photo and a foreground photo.
Superimpose is a great app for layer masking. Layer masking is really a process of unmasking, where selected areas of your foreground image become transparent revealing the background image underneath.
Superimpose also offers basic editing options to adjust the colors, saturation, hue and contrast of your image. And with 18 blending modes, this is a great app for creating double exposure effects.
How To Add A Textured Background
Instead of the solid white background in the roses photo, I'd like to apply a texture. The steps listed below will take you through each stage of the process for changing the background of the roses image.
You can follow along with the tutorial using one of your own photos, or you can download the roses photo to use instead.
The process of layer masking requires a bit of forethought. You must know what images you want to use for your foreground and background.
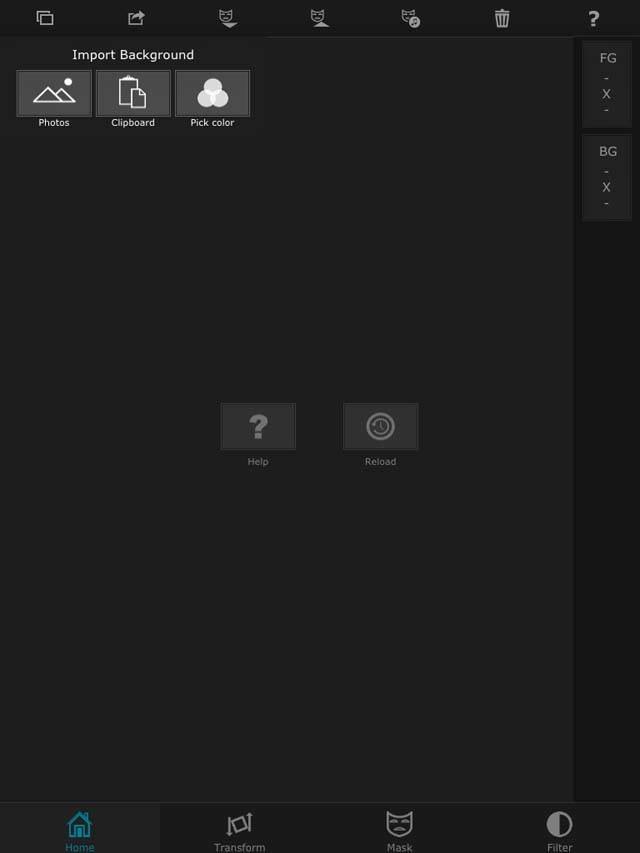
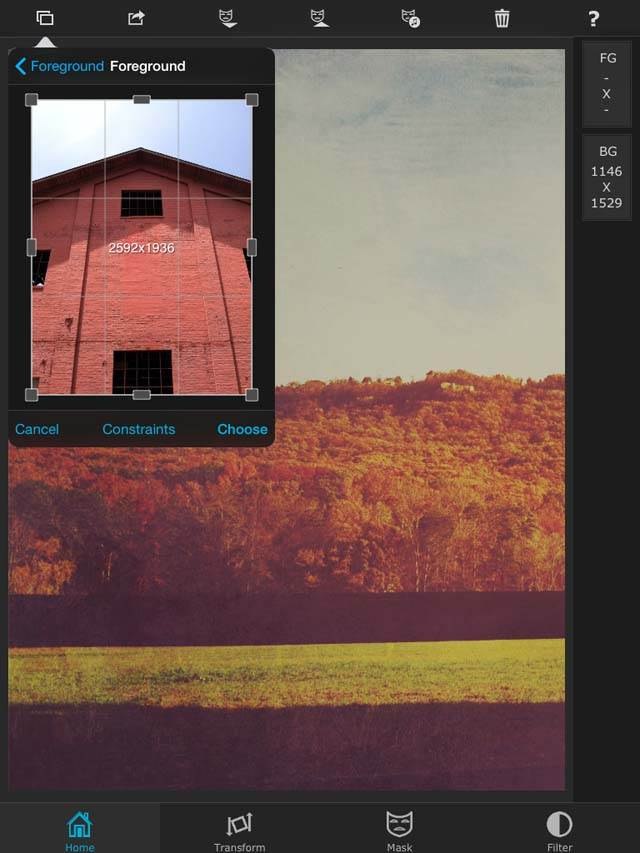
Tapping the icon in the top left corner of the Superimpose app brings up Import Background. The background image should be whatever you want as the new background in your photo. In this case, I'm using a texture background.
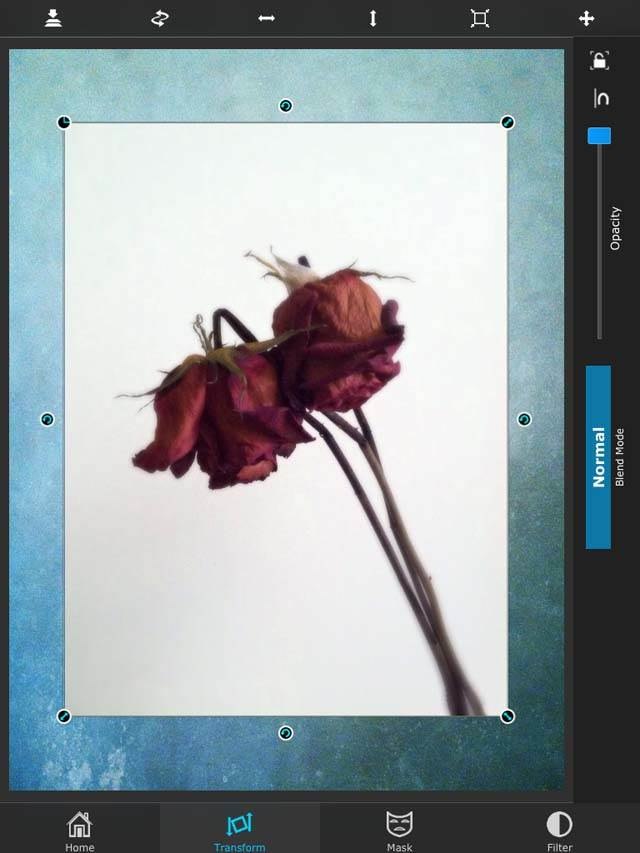
When you pull in the background you'll see its dimensions. If you wish to change the dimensions, click Constraints for a variety of different dimension options. In this case, my background and foreground have the same dimensions so I just tap Choose.
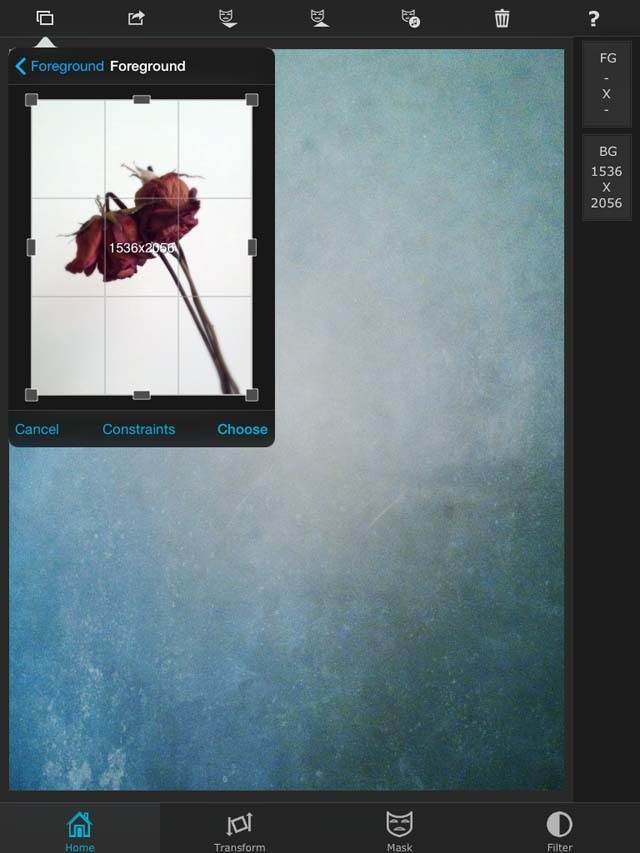
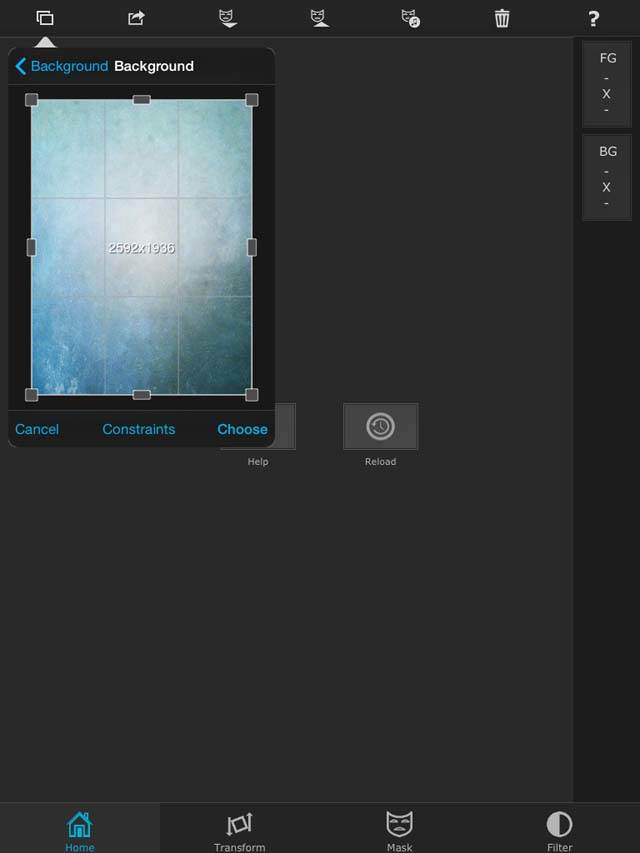
Before you can begin masking, you must grab another photo for the foreground. Tap on the camera roll icon again to pull in your foreground image. In Import Foreground, tap the Photos icon to pull in the rose photo.
Step 2: Resize Image To Fit The Background
Now you'll see the rose photo on top of the texture photo. I'd like for the roses to be the full size of the texture image so I must go to the Transform section. Transform is for panning, sizing and rotating the foreground image.
You can also flip the image vertically or horizontally, and if you decide you want to swap the the foreground and background images, you can do that here too. I simply want to fit this image to the background photo so I tap the Fit to Background icon at the top right.
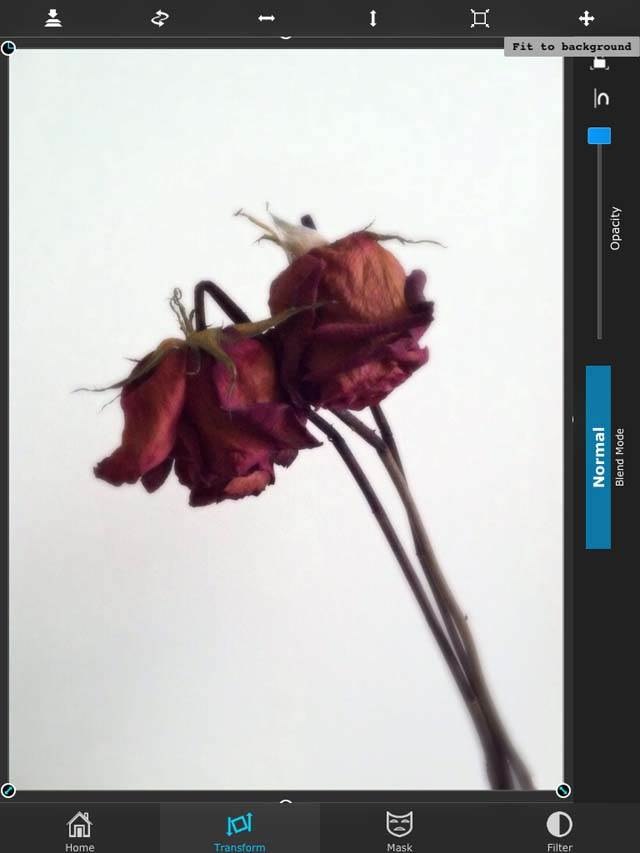
Step 3: Mask Using The Magic Wand Tool
The next thing to do is Mask. In this case, we're going to clear away the white areas to reveal the textured layer underneath. Go to the Mask section. The Magic Wand is highlighted by default. The Magic Wand is quite magical! This tool will mask similar color pixels in the surrounding area.
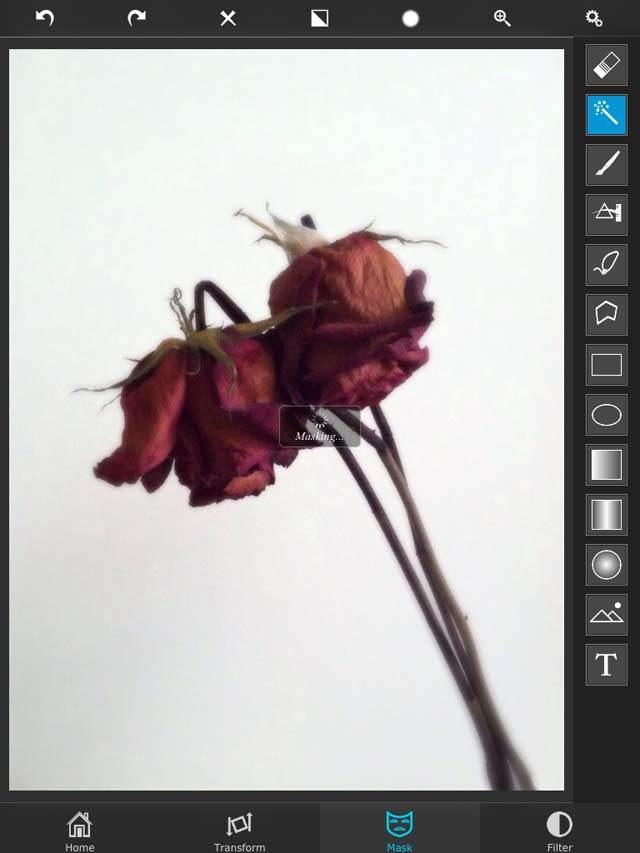
This means that by tapping anywhere in the white area of the rose photo, all (or most of) the white pixels will become transparent, showing the texture underneath.
The problem is that pixels that are close in color will also become transparent too so this tool works best when there is a strong color contrast between colors in your photo.
Step 4: Mask Missed Areas
Looking at the photo, it's clear there are a few areas the Magic Wand missed. That's no problem because we can pinch out to zoom in and use the Magic Wand on those small areas.
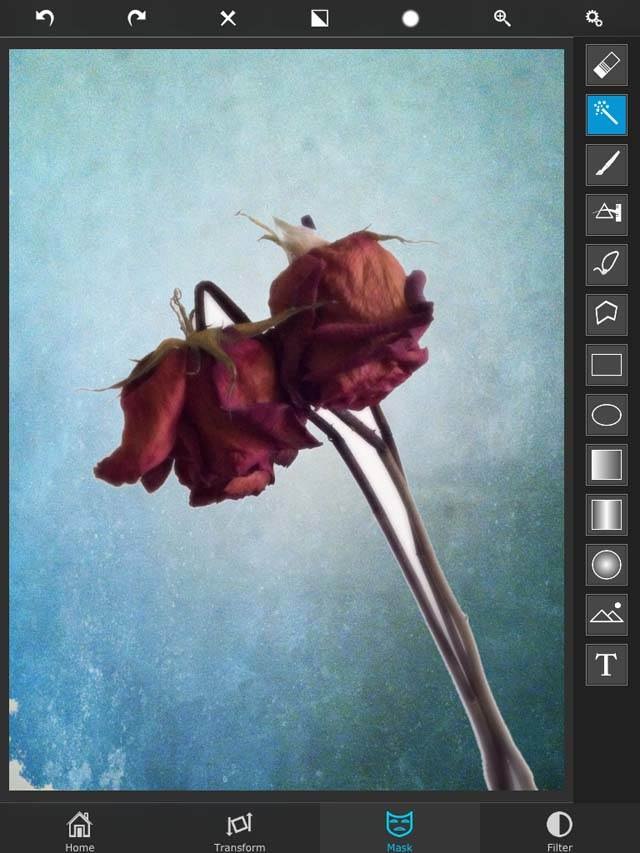
There is now just a very tiny area down at the base of the stem where the colors are very similar. The Magic Want tool probably won't work well here as it works best when there's a clear boundary between colors.
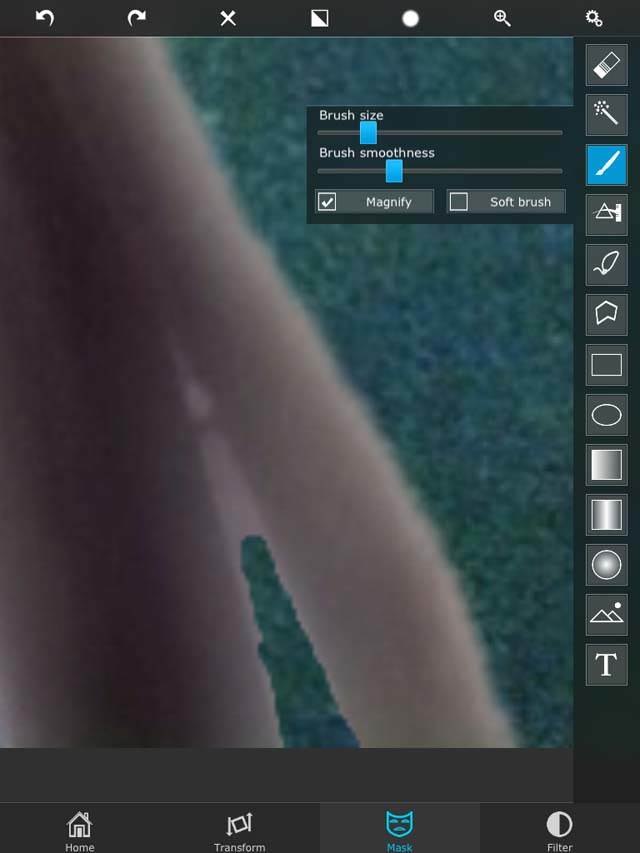
Instead I'll use the Brush tool. You can adjust the settings of the brush to increase or decrease its size as well as use the soft brush feature to apply the brush with softer edges. You can also use the Eraser to undo any mistakes.
Step 5: Save The Image
Now that I'm satisfied with my background, I go back to Home to save in high resolution.
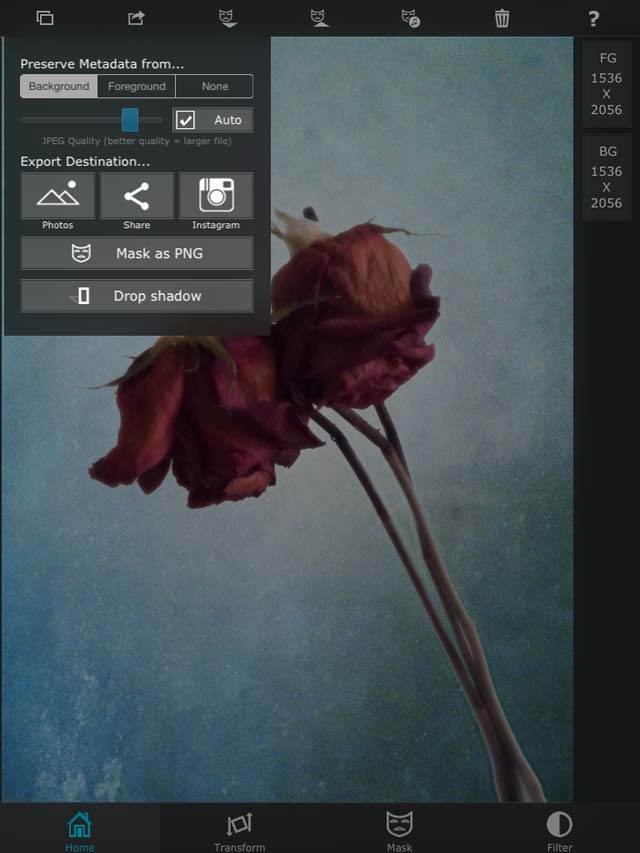
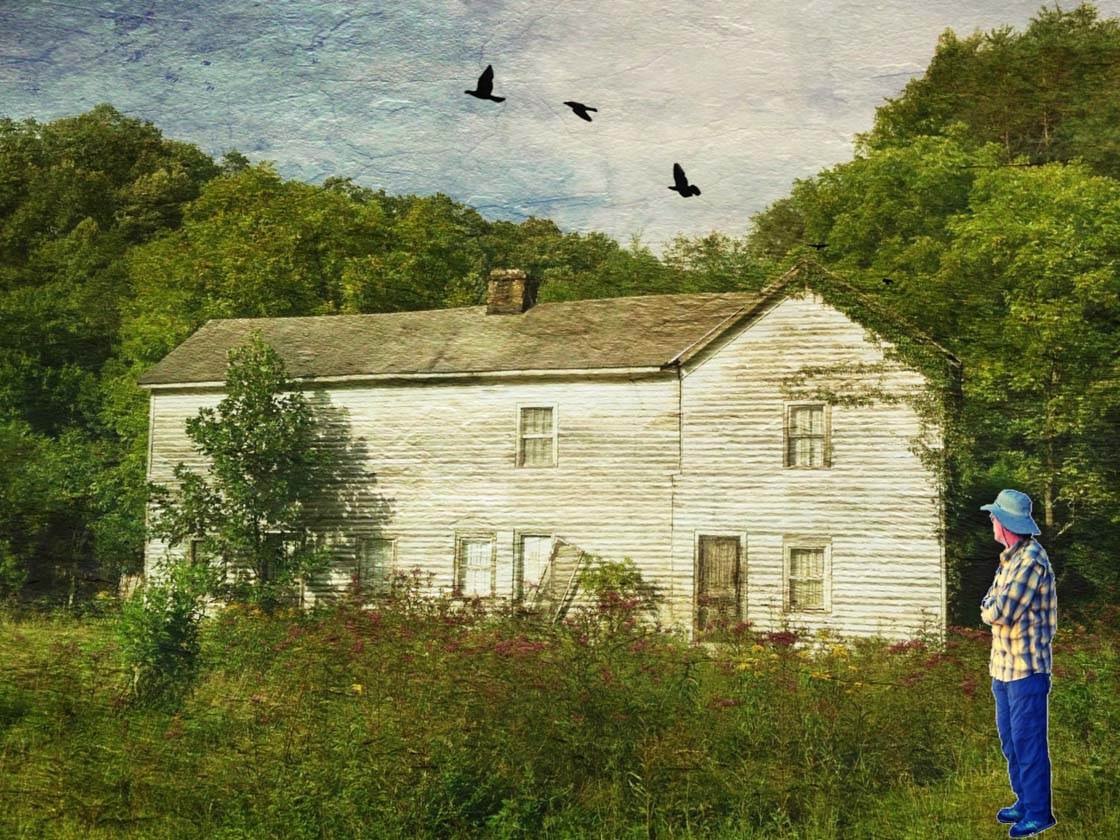
Below is the final image with the textured background added. Using this simple method, we can get creative without getting too complicated.
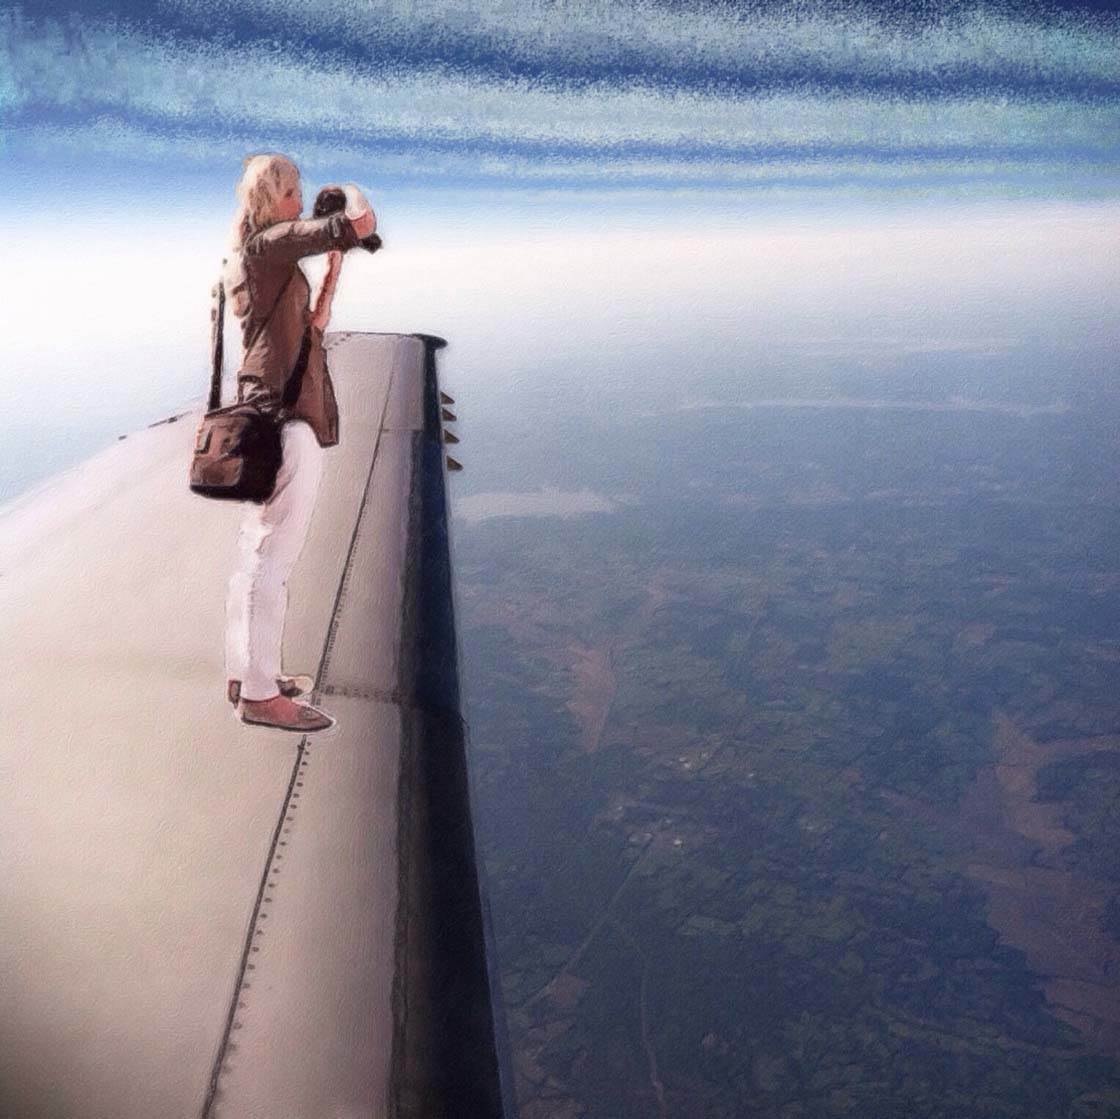
How To Add A Person To A Landscape
I often capture iPhone photos of people and put them into new environments through the same photo editing process as shown above. In the screenshot below, I used a landscape photo for the background and an image of a man for the foreground.
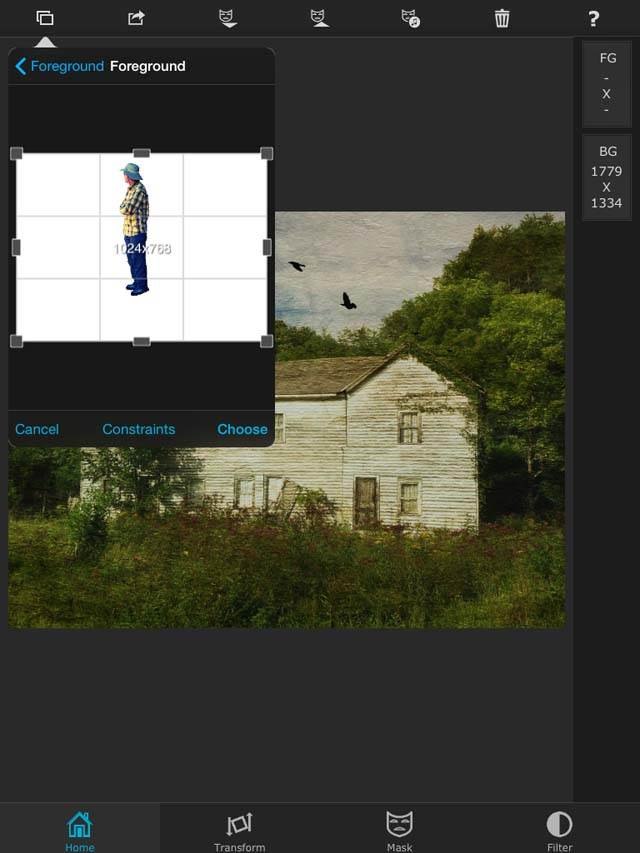
I had already done some photo editing and cleaned up this image so he now has a white background around him which makes this process much simpler. However, you can pull in the original image of a person and strip away the background with the mask just as we did with the rose photo.
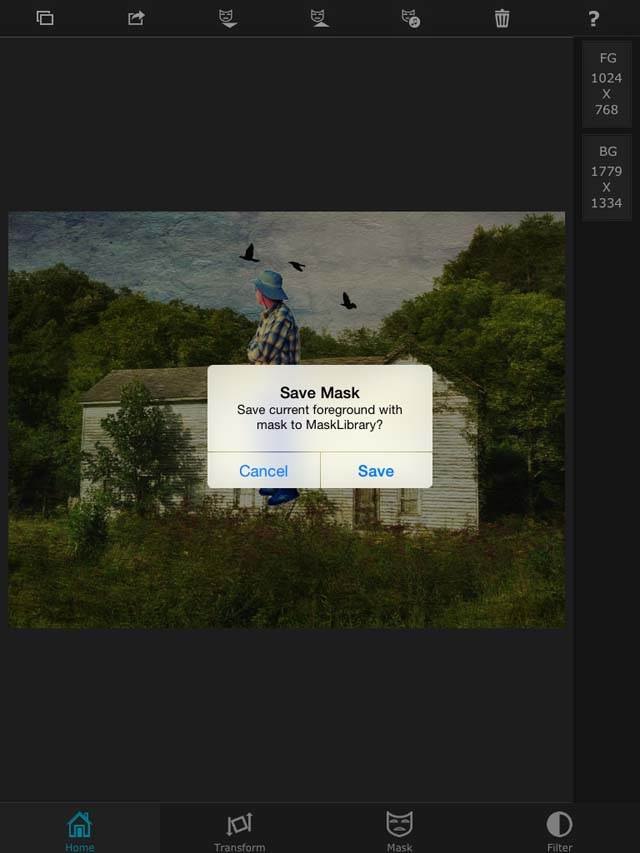
One of the things that's great about this app is that you can save a mask in a Mask Library for future use. Let's say I want to use this photo of the man in other scenes. Under the Home screen, I can save his image as a mask and use it in future works of art.
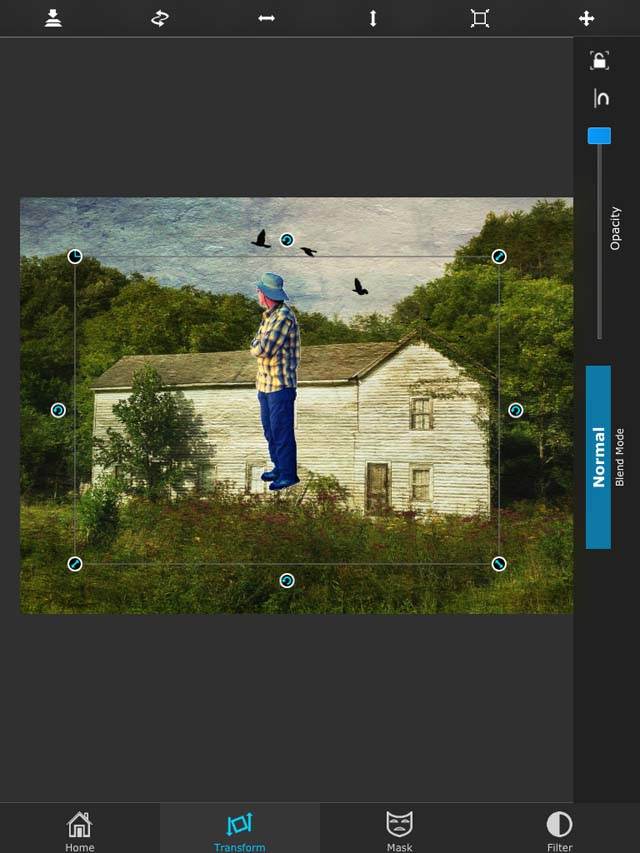
Using the Transform section, I decreased the size of the man so he is proportionate to the rest of the photo. Then I moved him to the right side of the photo to make it appear as if he's looking toward the house at the birds flying through the air.
How To Alter The Foreground Image
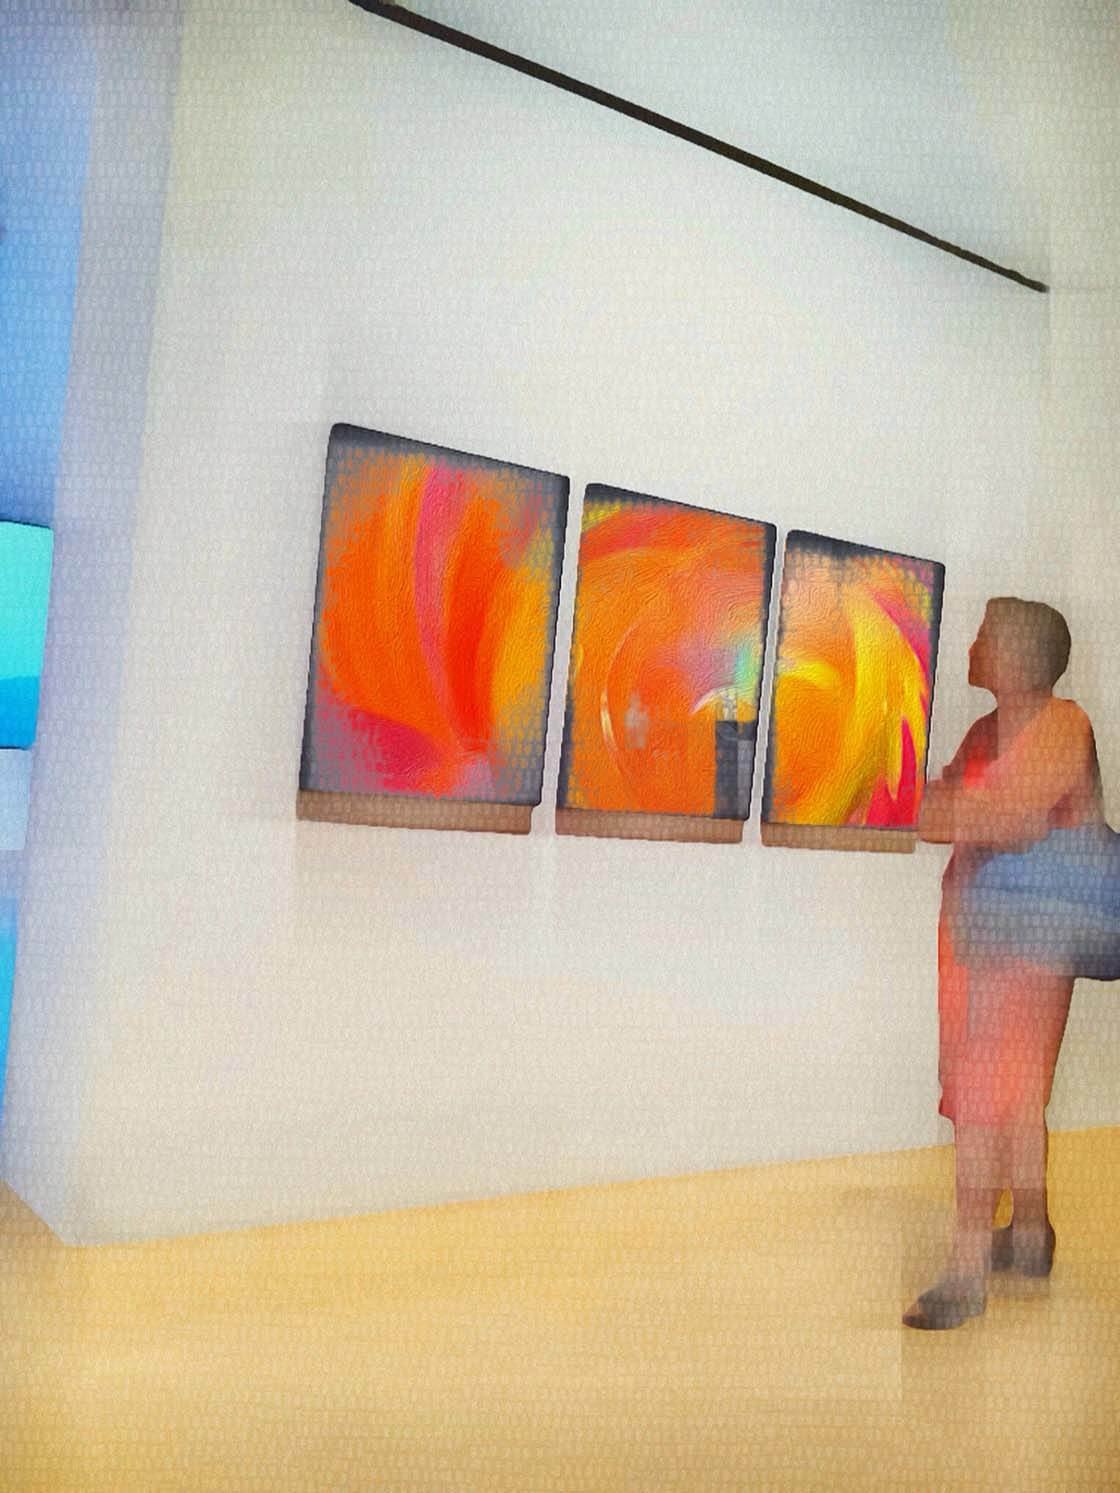
It's just as easy to alter aspects of the foreground image too. I thought it might be fun to add a flower abstract to the paintings in my art museum image.
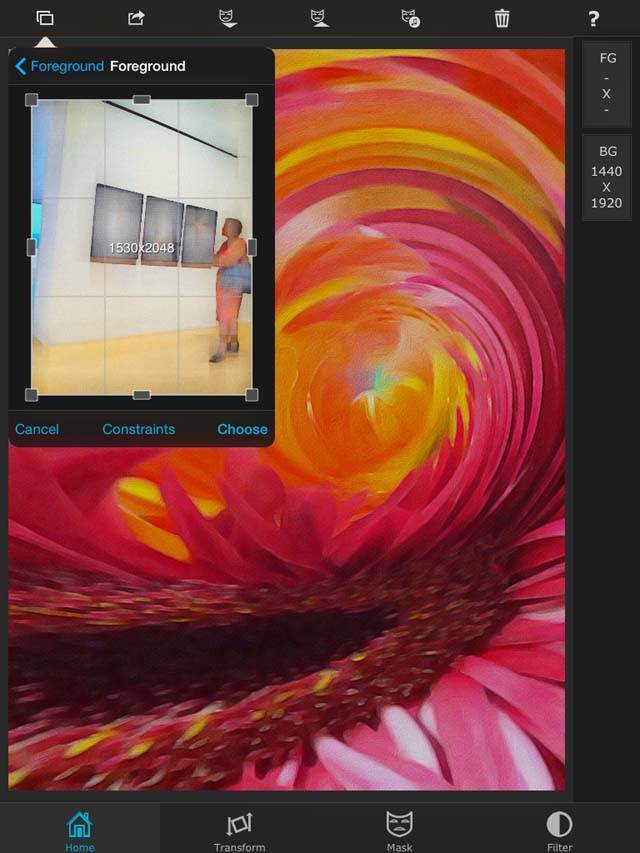
To do this, I used a flower abstract for the background and used the museum image for the foreground. Next, I made a few adjustments to the Magic Wand tool.
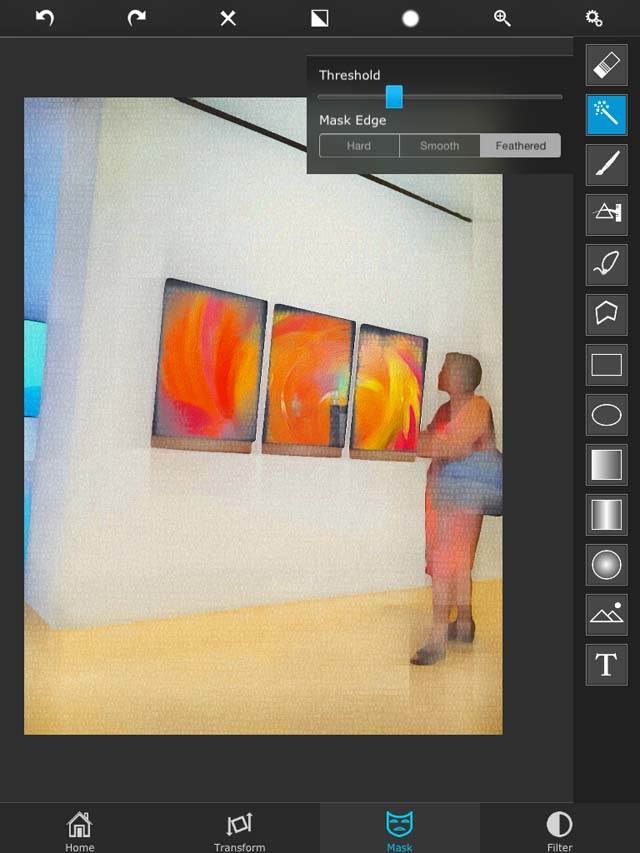
I lowered the Threshold setting a little. The threshold controls the amount of pixels that become masked (or transparent). A high threshold will mask virtually everything whereas a lower threshold will only mask a smaller area of pixels.
I also changed the Mask Edge to feathered which masks in light, feathery strokes rather than hard edges. Then I tapped on each of the paintings to make the foreground transparent, pulling the abstract colors through. Now, it looks like the paintings feature vibrant artwork.
Using this same process, I added a landscape to a building giving it the appearance of a painted facade. The landscape photo was used as the background and the photo of the building was used as the foreground.
Using the Magic Wand set to a threshold of 30 and the mask edge feathered, I tapped in a few select areas. The feathered edge produced a subtle effect which allowed the building's brick to show through.

Using Superimpose is a great place to start editing your photo when you want to alter the look of the background or foreground. It's one of the first places I go to create unique photos. As you can see, with only a few simple steps you can create a brilliant work of art.
If you've enjoyed this article, click here to for a more in-depth tutorial on how to use Superimpose to blend multiple iPhone photos.
How To Add Background To Picture On Iphone
Source: https://iphonephotographyschool.com/add-backgrounds/
Posted by: bateshipleoped.blogspot.com
0 Response to "How To Add Background To Picture On Iphone"
Post a Comment